Archive for the ‘Home & Garden’ Category

DIY Patio Makeover

Monday, June 13th, 2011

At this point, I’ve talking about the NEW PATIO and the BIG REVEAL so many times I’m afraid this is going to be sort of a let down to everyone expecting a Yard Crashers style makeover complete with water feature and hot tub and 12-foot fireplace. It is not that crazy. BUT. If you consider this was all done in 1 week by hand by two guys, two women and a toddler, THEN it is impressive. Two guys, two women and a toddler, who, I might add, have never built a patio before. Now you can be impressed.

One more time, BEFORE:

AFTER:

BEFORE:

AFTER:

BEFORE:

AFTER:

Good changes, yes?

The rock wall for the side garden is built out of the flagstone that used to be in our walkways. All the plants in this garden were transplanted – either from my own garden or from my friend Merin’s. The lights closest to the ground are actually solar powered. The lanterns on the poles are for candles – you put these little blue things in the top and they’re supposed to repel bugs (I think the definitely help).

Dining table from Walmart, dishes/glasses from Target. The adorable “floating” shelf was the result of a joint brainstorming session, where E and I decided we needed a buffet for dinner parties. E made it out of scrap wood from our basement and attached it to the fence with chain I spray painted green. Then I used some tape and 3 more cans of spray paint to make the design. It folds up flat against the neighbor’s our fence when we’re not using it and can easily be removed and stored in the winter. Roses & hydrangeas are from my garden, displayed in tin cans (spray painted of course).

Seating set, end tables & throw pillows from Target, firepit from Home Depot. Throw blanket is from Pier 1. Flower pots are from various places (including some I already owned & spray painted). Tray (that I spray painted) and mugs are from Goodwill. See that dark purple vine in the blue pot? It’s called “Sweet Caroline”.

Did you enjoy my attempt at a Martha Stewart worthy photo shoot? It’s been pouring rain for two days so everything is sort of damp and grey but it still looks pretty good. For a little reality check, here’s the patio during dinner on Sunday night:

And now for my absolute favorite part of the patio: nighttime.

String lights are from Target and plug into a super handy outlet right inside the garage window. The fire pit actually gives off enough heat to make a cool night comfortable and is PERFECT for s’mores making.

Showing my appreciation for all E's amazingly hard work


In case you were wondering, the total costs of the project were:

$2016.26 for the patio itself, including all the supplies, tools, stone, sand, gravel and plate compactor rental. (Not included: lots of pizza for the workers).

$1841.77 for EVERYTHING else, from the furniture and pillows down to the candles and plants.

Grand total: $3858.03.

We estimate that if we’d hired someone to do all the work for us, the labor and material total (not counting any of the decor or furniture) would have been at least $8,000. It was a LOT of digging.

Special thanks to my mom and dad who did at least 50% of the work on this and only had one night to enjoy it. I can’t wait until they come back again for more s’mores and wine on the patio.

Edited to add: You can see the much less glamorous doing-the-work photos and information here.

Thirty Hand Made Days


Pati-OMG

Monday, June 6th, 2011

Here’s today’s free tip: THERE IS A REASON IT COSTS A LOT OF MONEY TO HAVE A PATIO PROFESSIONALLY INSTALLED. It is not a nice, easy weekend project. It is a ton of work. Actually several totally literal tons. Tons of brick and sand and gravel and dirt. “More dirt!” was our mantra of the week – even the toddler says is now. Constantly. There is dirt under my fingernails I may never get out. Every surface on the first floor of the house is coated in grime. Even the carpet in my bedroom THREE FLOORS UP is dirty. It’s going to take me another week just to get the house clean.

Ok, it’s going to take me a MONTH to get the house clean – because I’m going to be too busy relaxing on my patio to bother with vacuuming. Who can be bothered when there’s s’mores to be made and wine to be sipped from my classy new plastic wine glasses?

This is not the dramatic before and after picture post (that one is coming as soon as my dining table gets here)(and after E builds me a shelf)(unless he takes a month to build the shelf because I am not waiting that long) that’s going to BLOW YOUR MIND. This is the “look at all the work we did to get to the “after” post” so the after post doesn’t end up being a bazillionty pages long. Now it will only be half a bazillionty pages long.

This is the yard in March, before the lawn guys raked up the leaves and before most of the green stuff came up:

Here’s the yard just last week:

The grill was totally neglected in that dirt spot behind the big tree, the flagstone paths were always full of weeds and impossible to shovel in the winter, the grass never grew next to the garage, the back steps were a MESS and the slope of the yard meant there was a huge mud puddle right in front of the steps when it rains.

It was not a good space, not for me, not for E, not for the kids.

Here’s how we started the project:

E and I tore up all the walkways, but saved the stone to reuse in the project later.

E built a planter bed out of 4×4’s behind the tree so we had somewhere to put all the dirt – and so I had someplace to put all the hostas I dug up when we took out the walkways.

Dad and E spent TWO FULL DAYS just digging. I helped (truly, I did help) but I am just not strong enough to do much good. That tiiiiiny hill to the left of the garage ended up being full of roots and concrete. They worked so hard they both deserve medals. And several cases of beer.

Mom did a GREAT job watching the kids, especially since Caroline has been a crazy teething monster for days and needed CONSTANT attention. I seriously don’t know what I would have done without Mom.

These are the pavers I chose for the patio – they’re just brick that’s gray instead of red. It was a budget choice as much as an aesthetic one (they were about $2.o4 per square foot), but in the end I LOVE them. E and I did all the design stuff ourselves with some practical and/or math help from my Dad. We ordered 2250 of these…and have about 14 left over. GOOD ESTIMATING.

These are the stone we chose for the retaining wall. I was very excited to find that these only cost $2.15 a piece, which was LESS than the ugly cheap looking ones. We went back for more twice to get the height/length of the wall exactly right but since we only bought a dozen at a time we didn’t need them delivered.

So in total, we had to dig down 6 inches from where the top of the pavers were supposed to go to lay down 3 inches of gravel and then an inch of sand (the pavers were 2 inches high). And when we finished digging out each of those layers we had to make sure the top was totally level. E leveled dirt AND gravel AND sand with just some 2×4’s and PVC pipe.

We ordered the gravel and sand from a local family place (actually the same family who we buy our Christmas tree from) and they delivered it all in big giant trucks that dumped it in our driveway. It was SIGNIFICANTLY cheaper (close to 70% less) to order it in bulk than to buy it in bags from the hardware store. They also helped us figure out how many cubic feet to order to cover 500 square feet of ground.

After the gravel was all down, we rented a stamping machine from Home Depot. It took just a few minutes but was TOTALLY WORTH IT. The special gravel is made of lots of different sized pieces so when it gets pounded by the machine it locks itself together and becomes almost like cement. There is NO CHANCE any weeds are growing up through this patio (also because we laid down landscaping fabric).

My dad’s mantra when he does projects is “We have to do it RIGHT.” That included getting the yard almost totally level – I say “almost” because we intentionally sloped it a little so the water would drain away into the flower beds. We also added a drainage pipe to the downspout that runs under those steps made from 6×6’s so water from the gutters won’t wash anything away.

We might have broken our own rule and worked in the dark a few times once we realized we weren’t going to be done with our “easy project” by Wednesday.

The pattern for the pavers is called a basketweave, and that line of bricks around the edge is called a soldier’s course. Doing a curve along that wall and another along the back meant a lot of brick cutting, but Dad had a diamond blade for his saw so it wasn’t too hard. We added black edging to the sections that didn’t abut something solid so the pavers won’t move over time.

Little Evan was an expert shoveler by the end of the week and helped with spreading out the sand. We put sand over the pavers and then rented the stamper machine again. It leveled all the pavers and forced the loose sand into the cracks so now it’s all one extremely solid surface.

After it was stamped and swept again and wetted down we did all the clean-up work – cutting landscape fabric, planting things, putting together furniture, hanging lights. By the time my parents left our driveway on Sunday morning the only thing that wasn’t 100% done is reseeding parts of our lawn.

And here is a sneak peak at my “hanging out on the awesome patio” after photos. Also, my husband’s butt. He was grilling, which makes it even better.

More pictures coming soon – and finished, final, awesome, magazine-worthy makeover pictures coming hopefully before the weekend. Also coming: your invitation to a barbeque. Seriously, who wants to come over?

P.S. Before you ask, the answer to “will you come do mine next?” is NOT FOR ALL THE WINE IN THE WORLD.

Digging In For Summer

Friday, May 27th, 2011

Happy Friday!

Sweet tea, homeade sugar cookies & a beautiful bouquet of irises on the front porch. Bliss.

Yeah, I’m relaxing right now but not for long – it’s officially the start of patio weekend here in Connecticut! The weather looks like it’s going to cooperate (although we’re going to be literal hot messes by 10 am every day and chugging water by the bucketful) and Lowe’s came through with our pavers even though they told us LAST NIGHT they were out of stock everywhere. We’re ready to turn our crappy back yard into a fantastic family spot.

Here’s the before, as I write this, right now view of our future patio:

YIKES.

Wish us luck and no broken toes!

Mission: Pantry Organization

Monday, May 23rd, 2011

One of the disadvantages of living in an old house is a lack of closet space. Lucky for me, a previous owner did some rearranging and found room in our first floor hallway for a pantry. Bless their heart. Unfortunately, it’s not actually in the kitchen so when I’m putting away armfuls of stuff after making dinner I tend to just toss it onto the shelves so I can make as few trips as possible. Then I have groceries to put away and that stuff just gets shoved onto other shelves and before long I have fourteen cans of chicken broth because I didn’t see the ones behind the nine kinds of vinegar (<—– not an exaggeration. I use a lot of vinegar).

Also, I have pantry months. If you don’t have those in your part of the country, just count your blessings and enjoy not having to wrap up your pasta in Ziplock bags. So while I cleaned and de-mothed and threw out canned pineapple that was supposed to be used by June 2007 I decided to reorganize.

BEFORE:

AFTER:

Better, right?

I put a plain old shoe organizer over the door and filled it with anything that fit. Now I can see if I have taco seasoning or cocoa powder without digging through my shelves.

I put the stuff I use the most right at eye level and the stuff I only need once in a while high and low.

I painted the left wall with chalkboard paint (oh how I love chalkboard paint!) and attached chalk to a string so I can keep a running list of stuff as I use it up.

I reorganized items by how often I need stuff – that middle shelf is things I use almost ever night for dinner. Because I put so much on the door I now have enough room to see what I have and stock up on things we use most often, like tomato sauce and couscous. I added the stripes to make things fancy – I’ve been looking at too many Martha Stewart pantries on Pinterest. The stripes reminded me of an old fashioned grocer.

I used $1 baskets and bins to sort things that go together – cookie decorating stuff, tea, seasonings, herbs and spices, my emergency candy (labeled: emergency candy).

I used two $1 shower caddies for onions and potatoes. They’re on hooks so I can take them off the wall and rinse them out when I inevitably forget about a potato and it ends up molding.

I put all my flours and sugars into sealed containers to keep the months out. I splurged and bought large, wide mouthed ones at Target because I HATE trying to pour dry ingredients instead of scooping them with my measuring cups. They were the only part of this whole project that wasn’t either free (I already owned the paint, brushes and tape) or $1 (the baskets and smaller plastic containers).

See that top shelf? That’s apple, peach, strawberry and cherry jam plus sour cherries for pies all homegrown and hand-canned by my mother-in-law. Are you jealous yet? Come over and I’ll make you a pie – after I force you to admire my pantry in person. Yeah, I might be just a little too proud of FINALLY getting this mess cleaned up.


Monster Makeover!

Thursday, April 7th, 2011

The inspiration for Little Evan’s room makeover was this piece of art:

Evan the Nap Monster, by ModTots.

I ordered a monster – any monster, since they didn’t exist yet – as soon as I heard ModTots would be releasing them. So I actually bought half the stuff for the room before I knew what this piece would look like. But I knew it would be adorable so it wasn’t exactly a hardship.

I thought monsters would be a super easy theme for a kid’s room. I was wrong. Everything was Monsters, Inc the Pixar movie themed – and even that was hard to find. But I’m going to predict right now that monsters will be big by the end of 2011. Just watch.

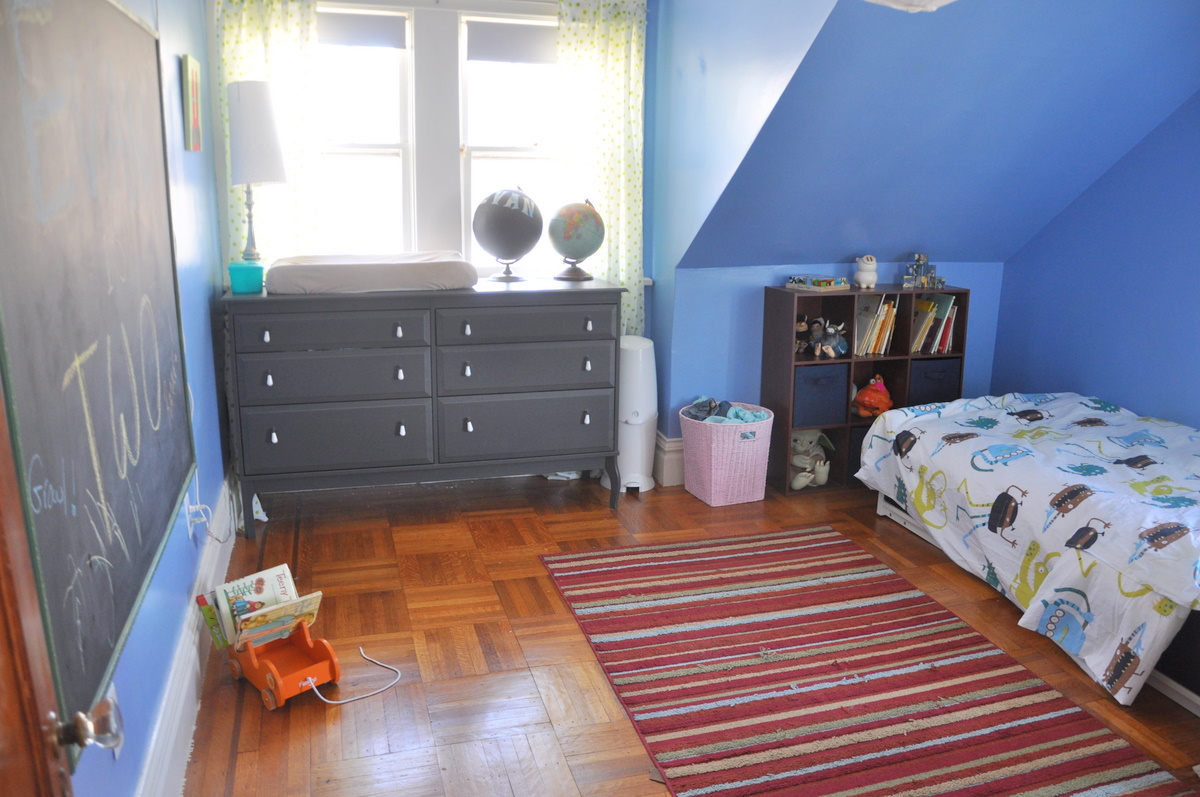
Before pics. The nursery theme was “nautical” slash “tropical island” slash “Where the Wild Things Are”. And also very messy.

View from the door

Left hand wall

Right hand corner

Right hand wall

And after pics:

View from the door (I know it looks like a different wall color, but that's just because I rolled up the black-out shades...something I forgot to do for the before pics)

Left hand wall (extra lines added by one very excited 2 year old)

Right hand corner

Right hand wall

Adorable monster prints from Lulufroot on Etsy (I think I need the green monster one too!)

Bookcase

Best bed friends - he kisses them both good night

Snake from Taradara, Bear handknit by me.

Daydreaming in his big boy bed

The rest of the details:
Bed: Ikea
Monster sheets & duvet cover: Garnet Hill
Dresser: Ikea
Ceiling lamp: Ikea
Standing lamp: Target
Rug (moved from our family room): Target
Curtains: Ikea
Bookcase: Target
Rocker: Ikea
Book caddy: P’kolino from Amazon.com

Close up of the book caddy because it's so freaking cute. Oh and also, when I bought it it was like $10, not $30+. Don't buy one until they go back on sale.

I’m sort of ashamed that the curtains are 84 inch curtains that you’re supposed to hem (and by hem I mean use the iron-on adhesive tape they came with) and yet I did not hem them. The problem is the radiator is right below the window on the right hand wall, so I’d have to cut them REALLY short to be safe. But I don’t want to hem the other set that short and I still want them to match, so I just tied them up. And truthfully, I kind of like how they look.

Also, we have a bed rail for the side of the bed so Little Evan doesn’t roll out while he’s sleeping. Not that I think he would – he’s not a super rolly sleeper – but he likes pushing his feet against something while he’s trying to fall asleep and since we took the crib rails away I thought it would be a good substitute. I just took it down for the pictures.

Night night!

So far, we’re having about a 75% success rate with the big boy bed. Wednesday was the first day nap time didn’t happen AT ALL, but he’s been pushing them back later and later since we made the switch. He does get out and run around and pull things out of the drawers and read all his books and climb in the chair…but when he gets tired he puts himself back to bed. And it’s nice that he can get himself out of bed and play in his room in the mornings so I have time to brush my teeth and get dressed before he starts yelling for me. But sometimes he cries a little because he misses his crib. I think he’ll get over it pretty soon though.

Disclaimer: This post was not sponsored in any way. All items were paid for with my own cash money.